Introduction to the Kinect for Windows SDK (v1)
So. You’re new to the Kinect for Windows SDK, or you tried out the beta and are ready for the big time? Awesome. While I’d love to do a walkthrough video like I did for Beta 2 but since the update my screen recorder software doesn’t get on with the Kinect. Bummer. So text it is.
What you need
Not a lot is changed in terms of requirements since Beta 2, but if you never tried it before what you need is:
- A Kinect, obviously.
- A Windows PC. A standard set up will run it, but for better performance more than the minimum 2GB of RAM and an i5 processor seem to do the job.
- Visual Studio 2010. But the Express versions work just as well but just aren’t as flashy. I recommend Visual C# Express.
- .NET Framework 4.0. If you’re up to date with Windows, though, this shouldn’t be a problem.
Then all that remains is to download and install the latest Kinect for Windows SDK. As of writing, the latest version is 1.0.3.190 if that helps. Inside the install lays everything you need to get your project up and running, including the latest Speech APIs, which are a godsend with Kinect. But that’s for another post.
I would also recommend downloading the Coding4Fun Kinect Toolkit which, as the name suggests, makes coding ever so slightly more fun (which, to be fair, isn’t particularly difficult). Download and save the files somewhere relevant. You only reference them rather than install them so make sure you don’t delete them. Believe me, I’ve done that.
So, with your downloads downloaded and installs installed, plug in your Kinect to a dedicated USB port on your machine and fire up Visual Studio/Visual C# Express and let’s get to it.
Setting up the development environment
If you’re new to Visual Studio, no worries. You just need to create a new project by clicking "New Project…" and going to Visual C# and a WPF Application.

Click OK and go to File -> Save All straight away. So you don’t forget to save the entire project.
Next you need to add the references to the Kinect SDK and the Coding4Fun Toolkit if you downloaded that. In the Solution Explorer on the right, or by pressing Ctrl + W, then S, right-click the References drop-down and click "Add Reference…".
In here there’s a lot of stuff you don’t need, but there’s a couple of things you do. First off under the .NET tab there will be a reference component called "Microsoft.Kinect". Select that and click OK. (If you see "Microsoft.Research.Kinect", that’s left over from when the SDK was in Beta and make sure you don’t click that one otherwise bad stuff’s going to happen…
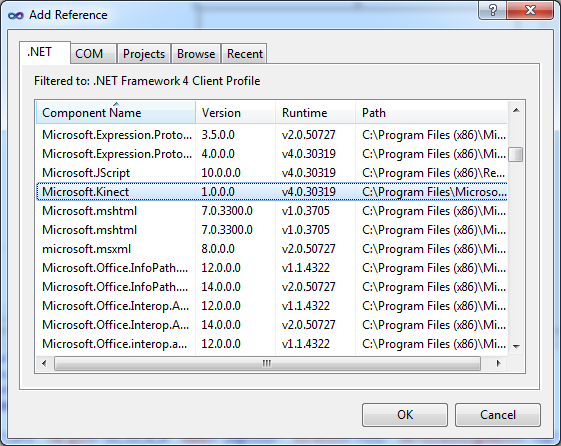
Do the same for Coding4Fun if you got it, but use the Browse tab and find where you saved it. Simple.
Setting the scene
You should default to MainWindow.xaml. If not, double click it in the Solution Explorer (Ctrl + W, S)
In the Properties window (Ctrl + W, P), make sure it says Window (and then possibly <no name> in grey letters next to it) and find the Width property and set it to 800. Do the same for height, but 350.
From the Toolbox on the left (Ctrl + W, X), under "Common WPF Controls", click and drag a couple of Images from there onto your Window.
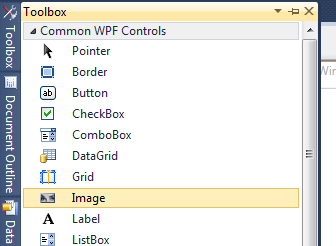
Resize both Image controls to be 320x240 and move one to the far left and the other to the far right of the Window.
Name the one on the left ‘imgColor’ and the other ‘imgDepth’ by clicking where they say "image1" and "image2" respectively and typing that in. That’s what we use to reference them in our C# code later on.
The code behind
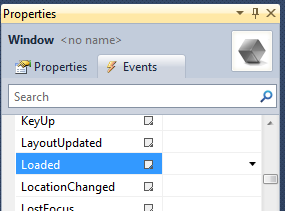
Click anywhere in the grey area on the MainWindow.xaml view and, inside the Properties panel (Ctrl + W, P) click the Events tab. It should default to showing "Loaded" but if not find it in the list. Double-click it and it will take you into MainWindow.cs, where the magic happens.
Your cursor should jump inside the method it just created, but if not click inside Window_Loaded and type inside itsetupKinect(). It’s a function we’re about to make to… well… set the Kinect up.
After doing that, outside the method, write out this lovely bit of code:
private void SetupKinect()
{
    if (KinectSensor.KinectSensors.Count <= 0)
    {
        //If there is no Kinect attached
        this.Title = "No Kinect connected";
    }
    else
    {
        //use first Kinect
        sensor = KinectSensor.KinectSensors[0];

        if (sensor.Status == KinectStatus.Connected)//If the Kinect we've attached isready to go...
        {
            sensor.ColorStream.Enable();
            sensor.DepthStream.Enable();
            try
            {
                sensor.Start();
            }
            catch (System.IO.IOException)
            {
                MessageBox.Show("One program at a time, please");
                throw;
            }
            //Fire a lovely event when we have new data to process
            sensor.AllFramesReady += new EventHandler<AllFramesReadyEventArgs>(sensor_AllFramesReady);

        }
    }
}
Make sure somewhere in your code you have defined what sensor is. It’s a KinectSensor, and you can put that code wherever. I would suggest putting it just above your definition of SetupKinect(). It looks like this:
KinectSensor sensor;
What all this code does is looks for a Kinect, hooks it up and brings in the RGB and Depth data. All we’re doing is listening for when these things are ready and letting that act on it. That’s sensor_AllFramesReady, and we’re coding that now...
void sensor_AllFramesReady(object sender, AllFramesReadyEventArgs e)
{
    using(ColorImageFrame colorFrame = e.OpenColorImageFrame())
    {
        if (colorFrame == null)
        {
           //If there is no color frame, do nothing
            return;
        }
        //Send the image to the WPF window
        imgColor.Source = colorFrame.ToBitmapSource();
    }

    using (DepthImageFrame depthFrame = e.OpenDepthImageFrame())
    {
        if (depthFrame == null)
        {
           //If there is no depth data, do nothing
            return;
        }
        //Send the depth data in a visual form to the WPF window
        imgDepth.Source = depthFrame.ToBitmapSource();
    }
}
When the event fires, it’s sending information about what’s coming from the Kinect to it through e. First we’re using the specific data we need at that time, checking if there’s anything new and, if there is, pushing it to the image controls we created. This is using a Coding4Fun methodToBitmapSource() which, you guessed it, converts the 0s and 1s to a BitmapSource – the type of thing the image control likes – and saves you the hassle. Sweet.
Finally, flip over to your .xaml file and double-click on the Unloaded event and put stopKinect(sensor) inside it. We’re defining this function as:
void stopKinect(KinectSensor theSensor)
{
    if (theSensor != null)
    {
        //If the sensor is running, stop it
        theSensor.Stop();
    }
}
This just stops the Kinect and makes sure it’s not sending data to an application you don’t have open now. Tying it off and all that.
Wrap up
Try it. You should, provided all went well, see two images. You in typical colour fashion, then a fuzzy grey image of you and the room your in. That’s the visualised depth data.
You’ve made your first Kinect app. Woo!