Making a Flash webcam photobooth
What turned out to become part of our site implementation of Spangles Speed Sprint started out as a little experiment of mine. Following suit of sites such as DailyBooth, how hard can it be to grab an image from your webcam using Flash and add a watermark to it? Turns out, not too difficult at all.
But what are we making after all this? Well, take a look for yourself. It's nothing exciting, but it's a page with a Flash file which takes a picture of your ugly mug, uploads it and will show the most recent picture underneath it. You'll need to refresh to see it appear when you've uploaded it, but hey, it's not the end of the world.
What you need
Basics require you know a bit of Flash and ActionScript 3, but even if you don't know a lot, I'll do my best to explain it all. Obviously, PHP is needed to upload stuff to your own hosting, and having a database never hurt anyone (just so you know who posted what and when, really)
Getting started
Make a new Flash file. It's always a good start.
The one I've made is 360x420, but that was dictated by the size of the webcam input I've got going on.
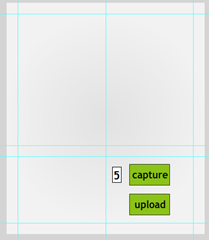
Make a couple of straight forward buttons – a capture button and an upload button – and plop them on their own layers on the stage with the instance names capture*mc and upload_mc, respectively. The input text box with a 5 in it? It's all about the watermarking (and it's specific to Spangles Speed Sprint in this instance) but feel free to get it in there too.
Cold, hard ActionScript
From here on in, it's all about the ActionScript. There's nothing else already on the stage.
We're doing some dirty coding straight on the timeline, here. Ideally, you would use class definitions in external ActionScript, but right now we're not all that bothered. It works and that's the important bit, right?
Our first line is rather important, but has nothing to do with Flash at all, really.
import com.adobe.images.JPGEncoder;
That's importing a set of important scripts to make it so we can upload and manipulate our picture from the webcam. You'll need to download the lovely [AS3 Core library][as3 core library] from GitHub and just have it sitting in a folder where your .fla is. (Having trouble? It's a similar process to installing Tweener, just we'll want the folder 'com' instead of 'caurina')
Setting up the camera
So we need some webcam input, right? There's a code block for that.
var cam:Camera = Camera.getCamera();
cam.setMode(320,240,15);
var video:Video = new Video(320,240);
video.attachCamera(cam);
video.x = 20;
video.y = 20;
addChild(video);
This creates an instance of a camera object called cam, sets it's size to the appropriate size, then adds the webcam to it using the Video instance. It then moves it so it's a bit away from the edge, then plonks it on the stage with addChild.
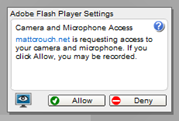
That will make it so you can see the person sitting at their computer assuming they've given you permission to do that. There's ways to detect whether they have given you permission or not, but this doesn't really look into it. Probably something you should look into if you're thinking of putting this anywhere people will likely abuse it.
Laying down the film
The next chunk of code is where the captured image will sit. You're basically placing a piece of paper to develop on the stage.
import flash.display.Bitmap;
import flash.display.BitmapData;

var bitmapData:BitmapData = new BitmapData(video.width,video.height);

var bitmap:Bitmap = new Bitmap(bitmapData);
bitmap.x = 20;
bitmap.y = 280;
bitmap.width = 160;
bitmap.height = 120;
addChildAt(bitmap,1);
The first couple of lines import the libraries that Flash needs to display bitmap data, but don't worry, these are built into the Flash program you're using, so no need to download any more GitHub-ness.
The next line makes the metaphorical piece of paper the same size as the webcam feed. The line after that puts a little layer of 1s and 0s so it knows where to plonk pixels, then it aligns it all up and adds the child to the stage.
Couple of quirks you might notice – we're setting the height and width again after the BitmapData is being made. That's just to make it fit on our screen, but it keeps the same size image for when we come to upload it. Secondly, addChildAt is used here simply because it was appearing underneath the background graphic I've got on my version. Feel free to use the normal addChild.
Button functionality
Unless you're a ActionScript 3 noob, you'll know what this does.
capture_mc.addEventListener(MouseEvent.CLICK,captureImage);

upload_mc.visible = false;
upload_mc.addEventListener(MouseEvent.CLICK,uploadImage);
So when the user clicks the capture button, the function captureImage will run, and if they click the upload button, uploadImage will run. The upload button is set to invisible to start off with so they can't upload a blank image. When captureImage runs, it's set to visible then.
captureImage
This function simply draws the image on display from the webcam at the moment the button is pressed, then displays the upload button. Simple, really.
function captureImage(e:MouseEvent):void {
  bitmapData.draw(video);
  upload_mc.visible = true;
}
uploadImage
Unfortunately, uploadImage isn't as simple.
function uploadImage(e:MouseEvent):void {
  upload_mc.visible = false;
  var myEncoder:JPGEncoder = new JPGEncoder(100);
  var byteArray:ByteArray = myEncoder.encode(bitmapData);

  var header:URLRequestHeader = new URLRequestHeader("Content-type", "application/octet-stream");

  var saveJPG:URLRequest = new URLRequest("post.php?spangleNo=" + txtSpangleNo.text);
  saveJPG.requestHeaders.push(header);
  saveJPG.method = URLRequestMethod.POST;
  saveJPG.data = byteArray;

  var urlLoader:URLLoader = new URLLoader();
  urlLoader.load(saveJPG);
}
We've first got it hiding the upload button, so they don't spam your server, then grabs that exposed picture you just took, encodes it to a JPG file, sets up the link to the PHP file that will upload your picture, pushes that picture into the data, then posts it to the PHP file. It's on the server that deals with it. (Obviously, it would just be 'post.php' in the URLRequest if you skimmed over the input text box bit).
The PHP side of things
Here's the bit where you just nod and smile.
<?php
require("connection.php");

if(isset($GLOBALS["HTTP_RAW_POST_DATA"])){
  $jpg = $GLOBALS["HTTP_RAW_POST_DATA"];
  $spangleNo = $_GET["spangleNo"];
  $filename = "images/". mktime(). "/assets/2011/03/making-a-flash-webcam-photobooth/.jpg";

  if ($spangleNo != 1 && $spangleNo != 2 && $spangleNo != 3 && $spangleNo != 4 && $spangleNo != 5) {
    $spangleNo = "watermark";
  }
  $overlayimg = "images/" . $spangleNo ."/assets/2011/03/making-a-flash-webcam-photobooth/.png";

  $icon = imagecreatefrompng($overlayimg);
  file_put_contents($filename, $jpg);
  $src_img = imagecreatefromjpeg($filename);
  imagecopy ($src_img,$icon,0,0,0,0,30,30);
  imagejpeg($src_img, $filename);
  imagedestroy($icon);
} else{
  echo "Encoded JPEG information not received.";
}

$date = date("Ymd");

$sql = "INSERT INTO webcam_booth (picurl,date) VALUES('$filename','$date')";

  if(!mysql_query($sql, $con)) {
    die("ERROR!" . mysql_error());
  } else {
    header("Location:index.php");
  }
?>
(the require line is just a file that contains database connection things. Google is your friend for that sort of thing)
The code checks something was passed to it by Flash (ie, nobody can just dump anything on my server), will set that to a variable, gets the spangle number from the input box, then gives it a file name.
Overlay image is all about the numbers mine prints on each picture. It makes sure each input it got is valid and puts the right image in the corner.
It then date-stamps the picture and SQLs it up to the database, before uploading the image to the server. If there's an error, it will tell you, and if they're uploading from another source (expandable in the future) it will send them back to the index page.
And that's all I can really show you before you try it yourself and start adapting it for your project. Let us know how it goes for you!